— by Terence Falk
Perspective on a Discovery
During extensive examination to uncover the secret of Fredric Karoly’s technical process in the creation of his photograms, I was struck not only by the unique quality of the images, but his visionary ability to see new possibilities in the art of photograms that up to this point (and since) had not been realized. In my practice of 50 years as fine art photographer, educator and photo historian, I have never seen photograms such as these. My ultimate discovery was that they represent a completely unique and never before seen approach to photographic image making.
Karoly successfully hybridized the processes of the traditional photogram, together with traditional black and white darkroom printing techniques, to achieve his vision. These prints utilize the act of creating states of variations as he progressed with his ideas and experimentation. The photograms he proposed to e.e. cummings for the Anthropos Series are steeped in surrealism. They invoke a theatrical narrative with the feel of Indonesian shadow puppetry. Other purely abstract compositions utilize carefully cut paper shapes, string, wire mesh, and various objects. Still others appear to be of mysteriously organic origin drawn from a surreal world.
The following technical report describes the extensive experimentation behind Karoly’s production of photograms and negatives created between ca.1943 to 1948. His creative approach was so complicated that his process and its variations need to be explained with a greater degree of clarity than has heretofore been understood about photograms — even by those who have some familiarity with the darkroom. The reader will realize the variations are virtually endless.
Introduction
This report has been created to ascertain the following:
- How the photograms were created
- The role the negatives in the collection played in the creation of the photograms
- If any of the prints from the collection are copy images and not original photograms
A Brief History/Timeline for the Photogram
The Traditional Photogram Process Versus that of Karoly
Photograms are created without a lens or camera. One simply places sensitive photographic paper down in the darkroom, adds objects on top of it, and then exposes the paper with an enlarger that is emitting only white light. (One could do the same with a bare light bulb or flashlight.) Upon development, any parts of the paper exposed to light will turn black, and those areas held back by the object remain white. This is paramount in understanding Karoly’s unique process, marked by two main factors that vary from traditional photograms: 1) his modification of light source at the enlarger; and, 2) his layering procedure.
Normally, a darkroom enlarger is used, and simply exposing the paper to its white light is sufficient (as seen below). However, Karoly’s procedure deviates from tradition in order to create incredibly complicated photograms.

The Karoly Process is quite different from the above
1) Cut out the main shapes on thin but opaque paper, possibly carbon or stencil paper —
keeping the cut-out pieces for a variation described later.
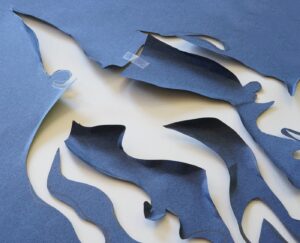
2) Above: Curl the edges of the cut shapes up and down to give them dimension.
This is very important since the farther away an object is to the paper,
an illusion of depth is created since the object is not absolutely flat on the photo paper.
Light can now bend around curved objects — and the result is a grey tone,
creating the illusion of depth and three dimensionality.
3) Place the unexposed photographic paper down first under the enlarger or other light source.
4) Add glass or plexiglass on top of the photographic paper. This serves to act as
a support for the cutout, which can be difficult to maneuver without such support.
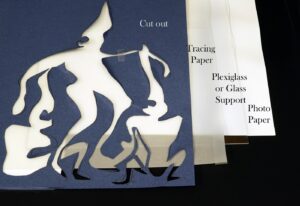
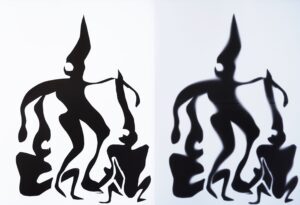
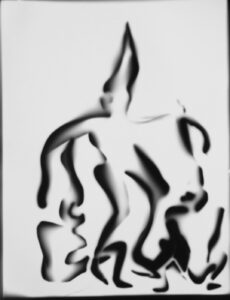
Above Left: My recreation of a Karoly-like photogram from the Anthropos Series using flat cutouts.
Above Right: The same cutout but with its edges curved and then covered with tracing paper.
6) Add the cut figures on top of the tracing paper.
7) Expose the paper, most likely with an enlarger, but possibly other light source.
NOTE: The exposure time will greatly affect the level of gradation of the tonalities.
8) Process the paper normally. You now have a photogram of the cut-out figures.
Extremely Important!
It must be emphasized that at this point, there are two ways for Karoly to create the finished photograms.
The following outlines both options:
Option A:
9) Process and dry the resulting photogram. You now have a traditional photogram print consisting of dark tones on a white background.
10) Take this photogram print and photograph it with a view camera and traditional sheet film.
11) Process this film. You now have what I refer to as a “template negative.”
 12) Take this negative (technically a copy negative of the original photogram), and place it in the enlarger
as you would if printing any traditional image-based negative, but now use its projected image to
expose the second generation photogram. This varies greatly from the traditional approach of
using nothing but white light, either from an enlarger or flashlight, to expose the paper.
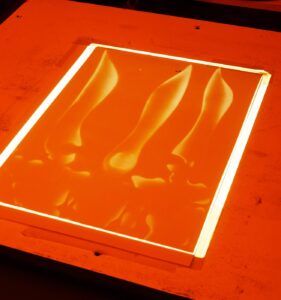
Above: An image of one of Karoly’s negatives projected onto photographic paper in the darkroom.
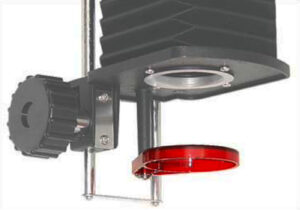
13) By adding a safety darkroom filter under the enlarger lens (left), one can have unexposed paper under the enlarger,
turn it on, and see the projected image without affecting the paper. Now, the placement of additional items onto the paper
can be done precisely, since you can see the projected image on the paper. Once one is satisfied with the placement of
objects, the enlarger is turned off, the filter swung out of the way, and the paper exposed. Since the original “template”
photogram is now in film form, it can used repeatedly, adding, moving, replacing any objects on the photographic
paper under the enlarger. Endless variations are now possible.
 14) With the template negative in the enlarger, Karoly could simply add items to the piece, such as thread, salt, sand,
cutouts, fabric, cotton, etc. He could easily see exactly where to place these items since the safety filter is being used
and the photo paper is not affected until he is satisfied with the arrangement. The use of the glass or plexiglass
support allowed Karoly to arrange the items and then carefully lift the whole assembly off the paper, expose and
process. If he didn’t like the result, he could replace the whole assemblage on the plexiglass over new paper,
make subtle shifts in the objects and make a new exposure. (Above: My addition of cotton for clouds and cut out stars
were added in safelight.)
Test Results of Option A:
Keep in mind that after the template negative has been exposed, each part of the image is created with different exposure times.
They are not all done the same time. This reinforces the concept of the copy negatives in Karoly’s collection.
He may have simply wanted to make additional copies of something very difficult to replicate.
Additionally, note I am showing the edges of my re-creations that show variations in the border tones,
which is also seen in Karoly’s work. This proves the process of multiple exposures because the photographic
paper may shift, the cutouts may be placed in slightly different positions, etc.
Option B:
After cutting and bending the original figurative cut-outs as described earlier, Karoly could have simply placed
everything onto the glass or plexiglass, put that on top of photographic paper, and exposed all of it at once including the original
cutouts of the figures.
The problem with this option is that it does not address the simple question:
why does his collection include negatives of the figures alone? After all, if one is going to do
everything by layering all the elements on the paper, there would be no need for a negative.
The simplest explanation is that Karoly realized the flexibility and endless possibilities he would have at his disposal
if negatives of the “template” photograms were created. It gave him much more control to alter the original central part of the
photogram and add other elements as he experimented.
 Above: My recreation of one of Karoly’s Anthropos themes with my cut-out, but now I
have replaced the cut-out parts, leaving spaces in between for the light to penetrate.
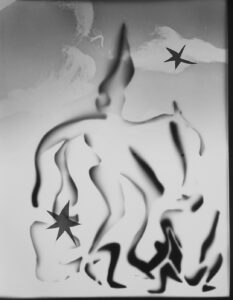 Above: Here is the same set-up as above, but now I have added clouds and stars.
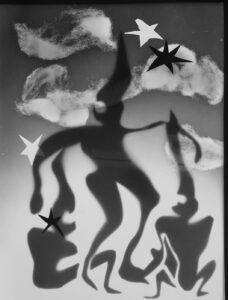
The black stars were cut out from a separate sheet of paper and placed on top with a separate,
longer exposure than the other items to make them darker in order for them to stand out.
Additionally, I added additional exposure gradually to the top half of the image and feathered it by hand
to create a gradation. This is referred to as “edge burning” in traditional darkroom printing.
 Above: In this version, I removed the cut-out parts of the figures and exposed this print as above.
This time the white stars were felt necessary, so they were added. You can see the clouds are different, as is
the case in many of Karoly’s prints. I added more edge burning to the top half of the image for added effect.

Above: This variation shows how I can flip the black stars (that were cut out of one large sheet
of black paper), to show up on opposite sides. The stars can change easily; I can put them anywhere I want.
The Karoly Negatives
Karoly used a view camera with “Ansco Supreme Pan” pack film, which was approximately 3.5 x 4.5 inches. The 24 negatives in the collection have been organized into two main groups:
“Template” Negatives: These negatives were produced using Option A as described earlier. Put simply, they are negatives of prints made of the main character or subject in the final photogram. These negatives were put into an enlarger and when projected, they became the light source for the final photogram, instead of simply using white light. I call them template negatives since they serve to create the main parts of the photogram over and over with variations added by the artist.
Copy Negatives: These are copies of final photograms, probably done so Karoly could make variations on the prints in the darkroom process as if they were traditional lens-based images created by a camera.
Printing the Karoly Negatives:

Left: With this original negative, I used its projected image to expose the paper below and added cotton for clouds.
Right: In this version, I added the black stars and replaced the stars made with wax paper with those made with an opaquer paper, allowing them to stand out more.
Thematic Categories of the Karoly Photograms
The photograms are organized by subject matter/concept into the following categories:
- Three Anthropos Characters, with Variations
2. Two Abstracted Figures Opposing Each Other
3. Central Shape with Tendrils
4. Seven Figures
5. Assorted Abstractions
6. Animals and Other Organics
Observations of the Construction of Selected Photograms
The following examples of Karoly’s photograms have been selected to further illustrate his technique:

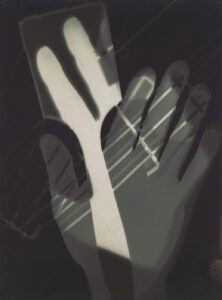
1) No.83 (from the Organics Series, Skull Face with Glasses) 4 x 3 inches
Karoly created this image by starting with an actual X-ray of his own head. In order for the final image to look like an
X-ray (note the dark bones), he would first make a photogram directly from that X-ray. Next, since that image
would be reversed, the print would need to be photographed, the film processed, and the resulting negative printed.
The printed negative is at right. This results in an image with a white background and black bones.
Next, the arms (or temples) of a pair of eyeglasses are removed and laid down on the print. Decorative shapes are added behind
and perhaps on top of the left lens. The resulting hybrid still life/photogram is photographed, the film processed, and the print at left
is the result. Note the reflections of the light source on the right edge of both lenses. The light was placed at the lower right.
Also note his addition of hands in the image. These are most likely real hands held in place during the first phase of creating the
original photogram but could be cut-outs or gloves. Karoly created the glow around the skull through additional exposure of the paper.

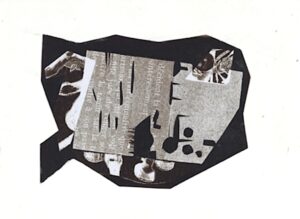
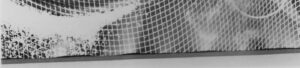
2) Untitled No.64 and Untitled No.63 (from the Anthropos Series) 25 x 9.25 inches
In the two photograms above, one can clearly see that the dramatic horizontal strips going through the image are the same in both.
If this was attempted by simply laying strips down on paper, they would have shifted when removed for developing. Therefore, the background,
as well as the figures themselves, are both from template negatives, one used, and then the other. The variations occur in the thread and/or
fibrous material added as well as adjusting exposure times. Notice the slight variation in the placement of the white wire at the eyes of the
lower figure and the missing left “eye” in the lower figure — another indication of the movement of key parts.
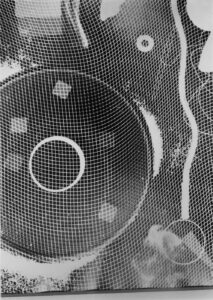
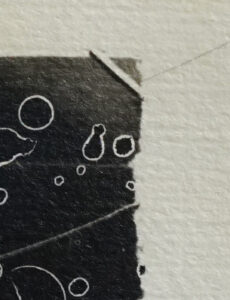
3) No.81 (from the Abstraction Series) 4 x 3 inches
In the close-up below, note the emulsion curling at the bottom edge of this print.
4) No.66 (from the Anthropos Series) 13.25 x 9.25 inches
In this version, the strips have not been used, yet the white wire or string lines remain the same. The fibrous material is more prominent, as are the bubbles or other defects on the glass support.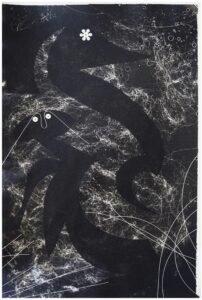
The tell-tale staple!
Note also the presence of a staple captured at the upper right corner of the print of the photogram at left. At some point in the process, a print was stapled down before being rephotographed.
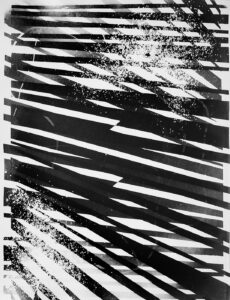
5. No.76 (from the Abstraction Series) 13.25 x 9.25 inches
In this photogram, there is really only one “set” of black
and white stripes running through the image.
First, Karoly added the powder at top and bottom. He then introduced a
projected image of the strips going in one direction, then flipped
the template negative over in the enlarger, and re-exposed the paper. Notice the
overlapping ends of the black strips on the left and right. Also note the powder
is NOT identical, showing that it was an added element that shifted on the
plexiglass or glass during the process.
Concluding Thoughts
Karoly created most of the photograms using the complex techniques described above, often with variations. These processes allowed him more flexibility to create different versions stemming from his original images.
Contemporary photographers such as Michael Flomen and Mary Zompetti use some of these techniques. Flomen uses sheet film to create his initial photogram, then process that film. Zompetti uses a chemigram. The results are photograms on film instead of paper. Now, prints of that photogram negative can be made. In a sense, those prints are copies of the original photogram as well.
About the Author
![]() With over fifty years of experience as a fine art photographer and educator, Terence Falk has exhibited throughout New England and New York. His teaching credentials include institutions such as The International Center of Photography in New York, The Maine Media Workshops, in Rockport, Maine, and The Fashion Institute of Technology in New York. His teaching focuses on his extensive expertise in traditional silver gelatin darkroom printing, historic processes, and contemporary concepts in photography.
With over fifty years of experience as a fine art photographer and educator, Terence Falk has exhibited throughout New England and New York. His teaching credentials include institutions such as The International Center of Photography in New York, The Maine Media Workshops, in Rockport, Maine, and The Fashion Institute of Technology in New York. His teaching focuses on his extensive expertise in traditional silver gelatin darkroom printing, historic processes, and contemporary concepts in photography.
Terence is also regarded as one of the finest printers of exhibition quality black and white photographs. The masters among his clientele have included Richard Avedon, Bruce Davidson, Philippe Halsman, Horst, Mary Ellen Mark, Duane Michals, Inge Morath, and Eva Rubinstein. Awards include an Artist Residency at the Virginia Center for the Creative Arts in Sweet Briar, Virginia and The Weir Farm Visiting Artist Fellowship, in Wilton, Connecticut. Institutional group shows include The Fashion Institute of Technology in New York, The Portland Museum of Art in Maine, The Aldrich Museum of Contemporary Art in Ridgefield, Connecticut, and The Fitchburg Museum of Art in Massachusetts. Institutional solos include The Center for Maine Contemporary Art in Rockport, Maine.